Our social:

Latest Post

Showing posts with label outlook. Show all posts

How to Add Your Gmail Account to Outlook 2013 Using IMAP

How to Add Your Gmail Account to Outlook 2013 Using IMAP


00_lead_image_gmail_in_outlook
If you use Outlook to check and manage your email, you can easily use it to check your Gmail account as well. You can set up your Gmail account to allow you to synchronize email across multiple machines using email clients instead of a browser.
We will show you how to use IMAP in your Gmail account so you can synchronize your Gmail account across multiple machines, and then how to add your Gmail account to Outlook 2013.

To setup your Gmail account to use IMAP, sign in to your Gmail account and go to Mail.
01_clicking_mail
Click the Settings button in the upper, right corner of the window and select Settings from the drop-down menu.
02_clicking_settings
On the Settings screen, click Forwarding and POP/IMAP.
03_clicking_forwarding_pop_imap
Scroll down to the IMAP Access section and select Enable IMAP.
04_enabling_imap
Click Save Changes at the bottom of the screen.
05_clicking_save_changes
Close your browser and open Outlook. To begin adding your Gmail account, click the File tab.
06_clicking_file_tab_in_outlook
On the Account Information screen, click Add Account.
07_clicking_add_account
On the Add Account dialog box, you can choose the E-mail Account option which automatically sets up your Gmail account in Outlook. To do this, enter your name, email address, and the password for your Gmail account twice. Click Next.
08_selecting_email_account
The progress of the setup displays. The automatic process may or may not work.
09_configuring_automatically
If the automatic process fails, select Manual setup or additional server types, instead of E-mail Account, and click Next.
10_selecting_manual_setup
On the Choose Service screen, select POP or IMAP and click Next.
11_selecting_pop_or_imap
On the POP and IMAP Account Settings enter the User, Server, and Logon Information. For the Server Information, select IMAP from the Account Type drop-down list and enter the following for the incoming and outgoing server information:
  • Incoming mail server: imap.googlemail.com
  • Outgoing mail server (SMTP): smtp.googlemail.com
Make sure you enter your full email address for the User Name and select Remember password if you want Outlook to automatically log you in when checking email. Click More Settings.
12_pop_imap_account_settings
On the Internet E-mail Settings dialog box, click the Outgoing Server tab. Select the My outgoing server (SMTP) requires authentication and make sure the Use same settings as my incoming mail server option is selected.
13_setting_up_outgoing_server
While still in the Internet E-mail Settings dialog box, click the Advanced tab. Enter the following information:
  • Incoming server: 993
  • Incoming server encrypted connection: SSL
  • Outgoing server encrypted connection TLS
  • Outgoing server: 587
    NOTE: You need to select the type of encrypted connection for the outgoing server before entering 587 for the Outgoing server (SMTP) port number. If you enter the port number first, the port number will revert back to port 25 when you change the type of encrypted connection.
    Click OK to accept your changes and close the Internet E-mail Settings dialog box.
    14_advanced_settings
    Click Next.
    15_clicking_next
    Outlook tests the accounts settings by logging into the incoming mail server and sending a test email message. When the test is finished, click Close.
    16_testing_account_settings
    You should see a screen saying “You’re all set!”. Click Finish.
    17_clicking_finish
    Your Gmail address displays in the account list on the left with any other email addresses you have added to Outlook. Click the Inbox to see what’s in your Inbox in your Gmail account.
    18_new_account_in_outlook
    Because you’re using IMAP in your Gmail account and you used IMAP to add the account to Outlook, the messages and folders in Outlook reflect what’s in your Gmail account. Any changes you make to folders and any time you move email messages among folders in Outlook, the same changes are made in your Gmail account, as you will see when you log into your Gmail account in a browser. This works the other way as well. Any changes you make to the structure of your account (folders, etc.) in a browser will be reflected the next time you log into your Gmail account in Outlook.

    Author : howtogeek

    How to Hide Email Addresses when Sending to Multiple Recipients in Outlook 2013

    How to Hide Email Addresses when Sending to Multiple Recipients in Outlook 2013


    00_lead_image_spam_email
    When sending email to multiple recipients (some of whom are unknown to each other), it’s recommended not to display everyone’s email address. Some people might get quite upset with you for advertising their email address to people they don’t know.
    Generally, when you send email to multiple recipients, you enter their email addresses in the Cc (Carbon Copy) field, where their addresses are visible to everyone receiving the email. This is acceptable if all the people already know each other and may even have the email addresses. However, if some of the people you’re including in the Cc field do not know each other, it’s not a good idea to use the Cc field and advertise everyone’s email address to everyone else.

    This is where the Bcc (Blind Carbon Copy) field comes in. Putting an email address in the Bcc field basically instructs the mail server to take off the address label before delivering the message so anyone receiving the email message cannot see who else received it. So, you can put all the email addresses of the recipients in the Bcc field. However, only putting email addresses in the Bcc field, with no address (or your own address) in the To field, may cause the message to be flagged as Spam by some junk email filters.
    There is a way around this. We will show you how to use your own email address as “Undisclosed recipients” for the To field and add the other email addresses to the Bcc field so you can safely send your message.
    Open Outlook and click the People link on the Navigation Bar.
    01_clicking_people
    NOTE: If you have the Navigation Bar displaying in the compact view, click the people icon.
    See our article to learn how to display the Navigation Bar in the compact view.
    02_clicking_people_on_compact_navigation
    In the New section of the Home tab, click New Contact.
    03_clicking_new_contact
    In the Full Name edit box, enter a name for this contact that will display in the To field. You can call it “Undisclosed recipients” or any other name you want. Enter your own email address in the E-mail field and click Save & Close.
    04_creating_new_contact
    Now, click Mail on the Navigation Bar. If you have the compact Navigation Bar, click the envelope icon.
    05_clicking_mail
    In the New section of the Home tab, click New Email.
    06_clicking_new_email
    Click To on the Message window.
    07_clicking_to
    Select the new contact made for your own email address, click To, and then click OK.
    08_selecting_undisclosed_recipients
    You may notice that there is no Bcc field available on the Message window. You have to add it. To do this, click the Options tab, and in the Show Fields section, click Bcc.
    09_showing_the_bcc_field
    The Bcc field is added to the Message window. Add the email addresses for all the people you want to receive this email either by clicking the Bcc button and selecting them, or by entering them manually in the Bcc field. As you start typing an address in the Bcc field, a matching address from your address book is suggested.
    NOTE: You can also create a distribution list containing all the email addresses you to which you often send emails as a group. See our article about creating distributions lists in Outlook 2013 to find out how.
    Some ISPs (Internet Service Providers) may put limits on the number of people to which you can send one email. In this case, try sending the message to 20 recipients or less at a time per email.
    10_entering_bcc_recipients
    If you send one email to multiple recipients with all the addresses visible to all, you can cause some people to receive spam, if some people on your list are not careful with the email addresses they have. There are plenty of other ways spammers can get your email address.


    Author : howtogeek

    How to setup gmail with outlook 2007 - gmail configuration for outlook

    How to setup gmail with outlook 2007 - gmail configuration for outlook


    To configure Outlook 2007 for your Gmail address:
    1. Enable POP in your email account. Don't forget to click Save Changes when you're done.
    2. Open Outlook.
    3. Click the Tools menu, and select Account Settings...
    4. On the E-mail tab, click New...
    5. If you are prompted to Choose E-mail Service, select Microsoft Exchange, POP3, IMAP, or HTTP, and click Next.
    6. Fill in all necessary fields to include the following information:
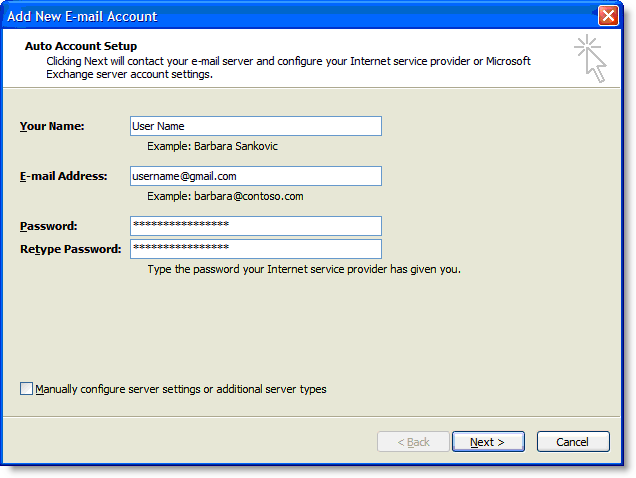
    7. Your Name: Enter your name as you would like it to appear in the From: field of outgoing messages.
      Email Address: Enter your full Gmail email address (username@gmail.com). Google Apps users, enter your full address in the formatusername@your_domain.com.
      Password: Enter your email password.
      Manually configure server settings or additional server types: Leave this option unchecked if you want to automatically configure Outlook 2007. If you want to manually configure Outlook 2007, check this box now. Google Apps users should configure manually as follows.
      Enter name, email address, and password
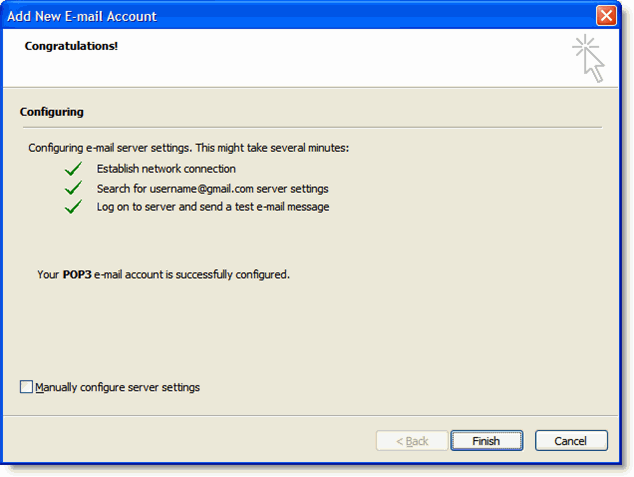
    8. Click Next. If you are configuring Outlook 2007 automatically, you're done! Just click Finish.
    9. Successful Configuration
    10. If you are configuring Outlook 2007 manually, select Internet E-mail and click Next.
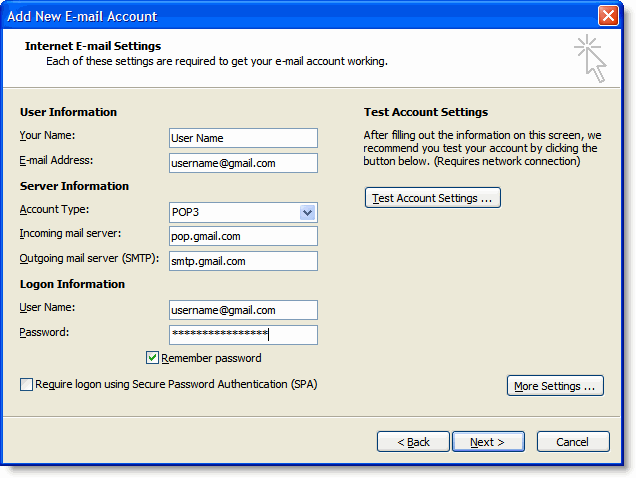
    11. Verify your User Information, and enter the following additional information:
    12. Server Information
      Account Type: POP3
      Incoming mail server: pop.gmail.com (Google Apps users, enter the server names provided, don't add your domain name in these steps)
      Outgoing mail server (SMTP): smtp.gmail.com
      Logon Information
      User Name: Enter your Gmail username (including @gmail.com). Google Apps users, enter your full address in the format username@your_domain.com
      Password: Enter your email password.
      Require logon using Secure Password Authentication (SPA): Leave this option unchecked.
      Account Settings
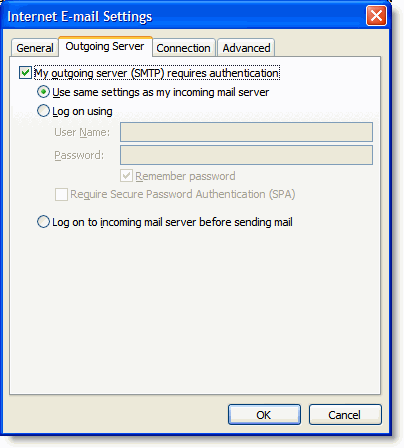
    13. Click the More Settings... button, and select the Outgoing Server tab.
    14. Check the box next to My outgoing server (SMTP) requires authentication and select Use same settings as my incoming mail server.
    15. Outgoing Server Tab
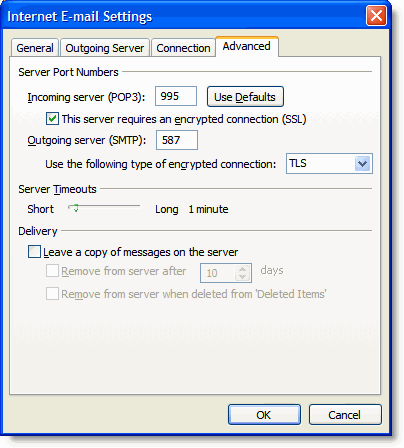
    16. Click the Advanced tab, and check the box next to This server requires an encrypted connection (SSL) under Incoming Server (POP3).
    17. In the Outgoing server (SMTP) box, enter 587, and select TLS from the drop-down menu next to Use the following type of encrypted connection:.
    18. Advanced Tab
    19. Click OK.
    20. Click Test Account Settings... After receiving 'Congratulations! All tests completed successfully', click Close.
    21. Click Next, and then click Finish.
    Congratulations! You're done configuring your client to send and retrieve Gmail messages.


    Author : webdesignerexpress