Our social:

Latest Post

Showing posts with label MIcrosoft. Show all posts

Create a local user account

Create a local user account


To create a local user account

  1. Open Computer Management.
  2. In the console tree, click Users .
    Where?
    • Computer Management\System Tools\Local Users and Groups\Users
  3. On the Action menu, click New User .
  4. Type the appropriate information in the dialog box.
  5. Select or clear the check boxes for:
    • User must change password at next logon
    • User cannot change password
    • Password never expires
    • Account is disabled
  6. Click Create , and then click Close .

Additional considerations

  • To perform this procedure, you must provide credentials for the Administrator account on the local computer (if you are prompted), or you must be a member of the Administrators group on the local computer.
  • A user name cannot be identical to any other user name or group name on the computer that is being administered. The user name can contain up to 20 uppercase characters or lowercase characters, except for the following:

    " / \ [ ] : ; | = , + * ? < > @

    A user name cannot consist solely of periods (.) or spaces.
  • In Password and Confirm password , you can type a password containing up to 127 characters.
  • The use of strong passwords and appropriate password policies can help protect your computer from attack.


Author : technet.microsoft

How to Add Your Gmail Account to Outlook 2013 Using IMAP

How to Add Your Gmail Account to Outlook 2013 Using IMAP


00_lead_image_gmail_in_outlook
If you use Outlook to check and manage your email, you can easily use it to check your Gmail account as well. You can set up your Gmail account to allow you to synchronize email across multiple machines using email clients instead of a browser.
We will show you how to use IMAP in your Gmail account so you can synchronize your Gmail account across multiple machines, and then how to add your Gmail account to Outlook 2013.

To setup your Gmail account to use IMAP, sign in to your Gmail account and go to Mail.
01_clicking_mail
Click the Settings button in the upper, right corner of the window and select Settings from the drop-down menu.
02_clicking_settings
On the Settings screen, click Forwarding and POP/IMAP.
03_clicking_forwarding_pop_imap
Scroll down to the IMAP Access section and select Enable IMAP.
04_enabling_imap
Click Save Changes at the bottom of the screen.
05_clicking_save_changes
Close your browser and open Outlook. To begin adding your Gmail account, click the File tab.
06_clicking_file_tab_in_outlook
On the Account Information screen, click Add Account.
07_clicking_add_account
On the Add Account dialog box, you can choose the E-mail Account option which automatically sets up your Gmail account in Outlook. To do this, enter your name, email address, and the password for your Gmail account twice. Click Next.
08_selecting_email_account
The progress of the setup displays. The automatic process may or may not work.
09_configuring_automatically
If the automatic process fails, select Manual setup or additional server types, instead of E-mail Account, and click Next.
10_selecting_manual_setup
On the Choose Service screen, select POP or IMAP and click Next.
11_selecting_pop_or_imap
On the POP and IMAP Account Settings enter the User, Server, and Logon Information. For the Server Information, select IMAP from the Account Type drop-down list and enter the following for the incoming and outgoing server information:
  • Incoming mail server: imap.googlemail.com
  • Outgoing mail server (SMTP): smtp.googlemail.com
Make sure you enter your full email address for the User Name and select Remember password if you want Outlook to automatically log you in when checking email. Click More Settings.
12_pop_imap_account_settings
On the Internet E-mail Settings dialog box, click the Outgoing Server tab. Select the My outgoing server (SMTP) requires authentication and make sure the Use same settings as my incoming mail server option is selected.
13_setting_up_outgoing_server
While still in the Internet E-mail Settings dialog box, click the Advanced tab. Enter the following information:
  • Incoming server: 993
  • Incoming server encrypted connection: SSL
  • Outgoing server encrypted connection TLS
  • Outgoing server: 587
    NOTE: You need to select the type of encrypted connection for the outgoing server before entering 587 for the Outgoing server (SMTP) port number. If you enter the port number first, the port number will revert back to port 25 when you change the type of encrypted connection.
    Click OK to accept your changes and close the Internet E-mail Settings dialog box.
    14_advanced_settings
    Click Next.
    15_clicking_next
    Outlook tests the accounts settings by logging into the incoming mail server and sending a test email message. When the test is finished, click Close.
    16_testing_account_settings
    You should see a screen saying “You’re all set!”. Click Finish.
    17_clicking_finish
    Your Gmail address displays in the account list on the left with any other email addresses you have added to Outlook. Click the Inbox to see what’s in your Inbox in your Gmail account.
    18_new_account_in_outlook
    Because you’re using IMAP in your Gmail account and you used IMAP to add the account to Outlook, the messages and folders in Outlook reflect what’s in your Gmail account. Any changes you make to folders and any time you move email messages among folders in Outlook, the same changes are made in your Gmail account, as you will see when you log into your Gmail account in a browser. This works the other way as well. Any changes you make to the structure of your account (folders, etc.) in a browser will be reflected the next time you log into your Gmail account in Outlook.

    Author : howtogeek

    How to Hide Email Addresses when Sending to Multiple Recipients in Outlook 2013

    How to Hide Email Addresses when Sending to Multiple Recipients in Outlook 2013


    00_lead_image_spam_email
    When sending email to multiple recipients (some of whom are unknown to each other), it’s recommended not to display everyone’s email address. Some people might get quite upset with you for advertising their email address to people they don’t know.
    Generally, when you send email to multiple recipients, you enter their email addresses in the Cc (Carbon Copy) field, where their addresses are visible to everyone receiving the email. This is acceptable if all the people already know each other and may even have the email addresses. However, if some of the people you’re including in the Cc field do not know each other, it’s not a good idea to use the Cc field and advertise everyone’s email address to everyone else.

    This is where the Bcc (Blind Carbon Copy) field comes in. Putting an email address in the Bcc field basically instructs the mail server to take off the address label before delivering the message so anyone receiving the email message cannot see who else received it. So, you can put all the email addresses of the recipients in the Bcc field. However, only putting email addresses in the Bcc field, with no address (or your own address) in the To field, may cause the message to be flagged as Spam by some junk email filters.
    There is a way around this. We will show you how to use your own email address as “Undisclosed recipients” for the To field and add the other email addresses to the Bcc field so you can safely send your message.
    Open Outlook and click the People link on the Navigation Bar.
    01_clicking_people
    NOTE: If you have the Navigation Bar displaying in the compact view, click the people icon.
    See our article to learn how to display the Navigation Bar in the compact view.
    02_clicking_people_on_compact_navigation
    In the New section of the Home tab, click New Contact.
    03_clicking_new_contact
    In the Full Name edit box, enter a name for this contact that will display in the To field. You can call it “Undisclosed recipients” or any other name you want. Enter your own email address in the E-mail field and click Save & Close.
    04_creating_new_contact
    Now, click Mail on the Navigation Bar. If you have the compact Navigation Bar, click the envelope icon.
    05_clicking_mail
    In the New section of the Home tab, click New Email.
    06_clicking_new_email
    Click To on the Message window.
    07_clicking_to
    Select the new contact made for your own email address, click To, and then click OK.
    08_selecting_undisclosed_recipients
    You may notice that there is no Bcc field available on the Message window. You have to add it. To do this, click the Options tab, and in the Show Fields section, click Bcc.
    09_showing_the_bcc_field
    The Bcc field is added to the Message window. Add the email addresses for all the people you want to receive this email either by clicking the Bcc button and selecting them, or by entering them manually in the Bcc field. As you start typing an address in the Bcc field, a matching address from your address book is suggested.
    NOTE: You can also create a distribution list containing all the email addresses you to which you often send emails as a group. See our article about creating distributions lists in Outlook 2013 to find out how.
    Some ISPs (Internet Service Providers) may put limits on the number of people to which you can send one email. In this case, try sending the message to 20 recipients or less at a time per email.
    10_entering_bcc_recipients
    If you send one email to multiple recipients with all the addresses visible to all, you can cause some people to receive spam, if some people on your list are not careful with the email addresses they have. There are plenty of other ways spammers can get your email address.


    Author : howtogeek

    How to setup gmail with outlook 2007 - gmail configuration for outlook

    How to setup gmail with outlook 2007 - gmail configuration for outlook


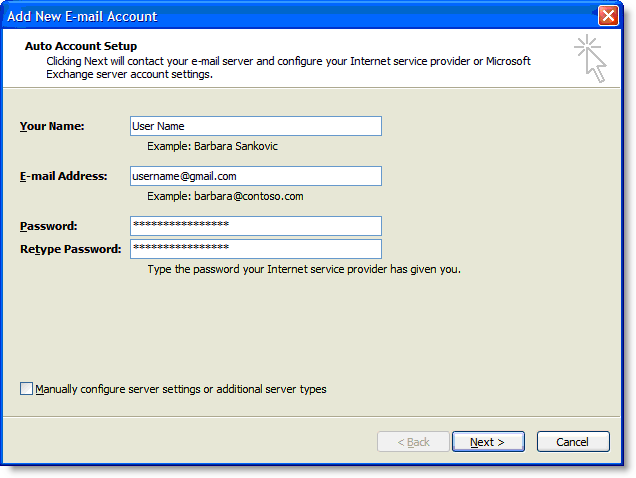
    To configure Outlook 2007 for your Gmail address:
    1. Enable POP in your email account. Don't forget to click Save Changes when you're done.
    2. Open Outlook.
    3. Click the Tools menu, and select Account Settings...
    4. On the E-mail tab, click New...
    5. If you are prompted to Choose E-mail Service, select Microsoft ExchangePOP3IMAP, or HTTP, and click Next.
    6. Fill in all necessary fields to include the following information:
    7. Your Name: Enter your name as you would like it to appear in the From: field of outgoing messages.
      Email Address: Enter your full Gmail email address (username@gmail.com). Google Apps users, enter your full address in the formatusername@your_domain.com.
      Password: Enter your email password.
      Manually configure server settings or additional server types: Leave this option unchecked if you want to automatically configure Outlook 2007. If you want to manually configure Outlook 2007, check this box now. Google Apps users should configure manually as follows.
      Enter name, email address, and password
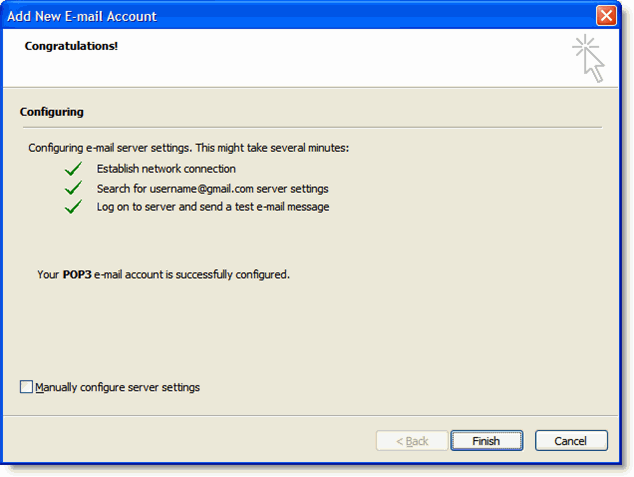
    8. Click Next. If you are configuring Outlook 2007 automatically, you're done! Just click Finish.
    9. Successful Configuration
    10. If you are configuring Outlook 2007 manually, select Internet E-mail and click Next.
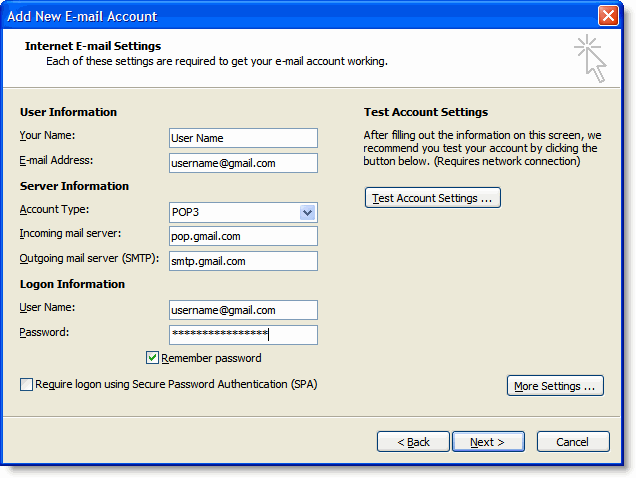
    11. Verify your User Information, and enter the following additional information:
    12. Server Information
      Account Type: POP3
      Incoming mail server: pop.gmail.com (Google Apps users, enter the server names provided, don't add your domain name in these steps)
      Outgoing mail server (SMTP): smtp.gmail.com
      Logon Information
      User Name: Enter your Gmail username (including @gmail.com). Google Apps users, enter your full address in the format username@your_domain.com
      Password: Enter your email password.
      Require logon using Secure Password Authentication (SPA): Leave this option unchecked.
      Account Settings
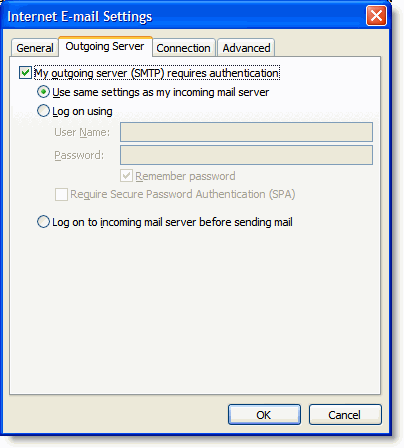
    13. Click the More Settings... button, and select the Outgoing Server tab.
    14. Check the box next to My outgoing server (SMTP) requires authentication and select Use same settings as my incoming mail server.
    15. Outgoing Server Tab
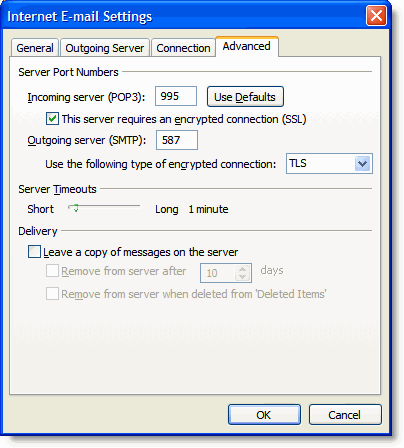
    16. Click the Advanced tab, and check the box next to This server requires an encrypted connection (SSL) under Incoming Server (POP3).
    17. In the Outgoing server (SMTP) box, enter 587, and select TLS from the drop-down menu next to Use the following type of encrypted connection:.
    18. Advanced Tab
    19. Click OK.
    20. Click Test Account Settings... After receiving 'Congratulations! All tests completed successfully', click Close.
    21. Click Next, and then click Finish.
    Congratulations! You're done configuring your client to send and retrieve Gmail messages.


    Author : webdesignerexpress

    Top 10 Windows 7 tips

    Top 10 Windows 7 tips

    Windows 7 keyboard shortcuts

    Use the below Windows 7 keyboard shortcuts to make the most of your Windows 7 experience.
    Windows key and the arrow keys
    Pressing the Windows key and Left or Right arrow keys will dock the window your viewing to the left or right-hand side of the screen. Pressing the Windows key and the Up arrow will maximize a window and pressing the Windows key and the Down arrow will resize and then minimize the window.
    Use Shift: To stretch a window vertically, press the Windows key + Shift + the Up arrow. If you have multiple monitors use the Windows key + Shift + the Left or Right arrow keys to move the window to another monitor.
    Windows key and plus and minus keys
    If you ever need to zoom in or out of what is being displayed on your screen press the Windows key and the + (plus) or - (minus) keys. Pressing the plus zooms in and once zoomed in the minus will zoom out.
    Clear all background programs
    If you are not viewing a window in full screen and have other windows open in the background clear all background open windows by pressing the Windows key + theHome key.
    • Full listing of computer shortcuts

    Use the Windows 7 search

    Find and run anything in Windows by using the Windows 7 search box. Click the Start orb or press then Windows key and type the name of the program you want to run or file you want to edit. Windows 7 does a good job at finding an exact match and simply pressing enter will execute that program or open that file. If more than one match is found, use the up and down arrow keys to select the file you want to open and then press Enter.
    Windows 7 search box
    Running as administrator: Some programs may require administrator mode in order to function properly. You can run any program as administrator from the search box by typing the name of the program you want to run and then instead of pressing Enter to run the program press Ctrl+Shift+Enter to run as administrator. If you want to click and run a program as administrator hold down the Ctrl+Shift and then click the icon.

    Take full advantage of the Taskbar

    Pin programs to the Taskbar
    All programs can be pinned to the Taskbar and allow easy access to your favorite programs without having to use the Start Menu. To Pin a program to the Taskbar right-click on the program or shortcut to the program and in the menu choose the Pin to Taskbar option. Alternatively you can also drag the icon to the Taskbar.
    If you want to remove a pinned program, right-click on the Taskbar icon and clickUnpin this program from the Taskbar. Alternatively you can also drag the icon off of the task bar and then click Unpin this program from the Taskbar.
    Move the icons and pinned programs
    Any pinned or opened program on the Taskbar can be moved and arranged. Left-click on any icon on the Taskbar and drag it to the location you want it to remain.
    Windows key and a number
    Pressing the Windows key and a number on the top row of your keyboard open the Window corresponding to the open program on your Taskbar. For example, in the picture below of the Windows 7 Taskbar, Firefox i the first icon, Control panel is the second icon, and Adobe Photoshop is the third icon. If the Windows key + 3 was pressed, Adobe Photoshop would become the active window. To make it even easier arrange your icons (as mentioned above) from left to right by most frequently opened.
    Windows 7 Taskbar
    Pin your favorite folder
    If you frequently access the same folder (e.g. your favorites, my documents, Dropbox, etc.) pin the folder to the Windows Explorer icon on the Taskbar. To do this drag your favorite folder to the Taskbar until you see Pin to Windows Explorer. Once pinned, right-click the Explorer icon to access that folder under the Pinned section.
    Open a second instance
    If you want to open a second instance or window of a program that is already open, press and hold the Shift key and then click the program icon on the Taskbar.
    Get to the Desktop
    Click the Desktop button on the far right edge of the Taskbar to get to the Desktop.

    Windows 7 notification area aka systrayCustomize the Notification area

    Windows Vista and Windows 7 allow the Windows Notification area (aka Systray) to be modified. By default, many of the icons shown in the past are now hidden and give Windows a much cleaner look. Customize this area to make icons show or not show by clicking on the up arrow next to the icons and selecting Customize, as shown in the picture. Once in Customize you can choose what programs show, don't show, or only show notifications.

    Improve the quality of your text

    Use the Windows ClearType Text Tuner to improve the overall quality of all text you read on your screen. To start the ClearType Text Tuner click the Start Orb and typecttune.exe and press Enter.

    Enable and disable Windows 7 features

    Turn on and off Windows features by clicking Start, typing features and press enter. In the Programs and Features window on the left-hand column click Turn Windows features on or off and in the Windows Features box check or uncheck the features you want enabled or disabled.

    Use the Reliability and Performance Monitor

    View the reliability history of your computer by using the Reliability Monitor. Click the Start orb and type reliability and press enter for View Reliability History. In the Reliability Monitor, you'll be able to view the overall reliability of your computer and be able to identify any past problems your computer has had.
    If you want to view the performance of your computer in real time use the Performance Monitor. Click the Start orb and type performance and press enter for the Performance Monitor. In the Performance Monitor, you can view your computers performance in real time or view a log of your systems performance.

    Re-enable underlined keyboard shortcuts

    File menu underlined shortcutsBy default, Windows 7 has the underlines for keyboard shortcuts like those shown in the picture. To re-enable these underlines in all Windows programs follow the steps below.
    1. Open the Control Panel
    2. In the Control Panel click Ease of Access
    3. In Ease of Access click Change how your keyboard works
    4. Finally, check the Underline keyboard shortcuts and access keys and then click Ok.

    Rename multiple files at once

    To change the name of multiple files at once highlight all the files you want to rename in Windows Explorer and press the F2 key. Type in the new name you want to use for all files and press enter. Once done all files will be renamed to the name entered followed by a unique number.

    Install Windows Essentials

    Install missing Windows software by installing the free Windows Essentials software package that includes: Windows Live Family Safety, Windows Live Mail, Windows Live Messenger, SkyDrive for Windows, Windows Movie Maker, Windows Photo Gallery, Windows Live Writer, and Microsoft Outlook Hotmail Connector.
    Author : Computer Hope

    NTLDR is Missing

    NTLDR is Missing


    Short for NT loader, NTLDR is a program loaded from the hard drive boot sector that displays the Microsoft Windows NT startup menu and helps Microsoft Windows NT/2000/XP load. This portion of the boot sequence was replaced by Bootmgr in Windows Vista and later versions of Windows.
    Below are the full error messages that may be seen when the computer is booting.
    NTLDR is Missing
    Press any key to restart
    Boot: Couldn't find NTLDR
    Please insert another disk
    NTLDR is missing
    Press Ctrl Alt Del to Restart

    Computer is booting from a non-bootable source

    Many times this error is caused when the computer is attempting to boot from a non-bootable floppy disk or CD-ROM. First verify that no floppy diskette or CD is in the computer, unless you are attempting to boot from a diskette.
    Note: This error has also been known to occur when a memory card is in a card readerand the computer is attempting to boot from it. If you have any card reader or flash reader make sure that no memory stick is inside the computer. Additionally, disconnect all USB drives, cameras, ipods, iphones, etc. from the computer.
    If you are attempting to boot from a floppy diskette and are receiving this error message it is likely that the diskette does not have all the necessary files or is corrupt.
    If you are attempting to install Windows XP or Windows 2000 and are receiving this error message as the computer is booting verify that your computer BIOS has the proper boot settings. For example, if you are attempting to run the install from the CD-ROM make sure the CD-ROM is the first boot device, and not the hard drive.
    Second, when the computer is booting you should receive the below prompt.
    Press any key to boot from the CD
    Important: When you see this message press any key such as the Enter key immediately, otherwise it will try booting from the hard drive and likely get the NTLDR error again.
    Note: If you are not receiving the above message and your BIOS boot options are set properly it's also possible that your CD-ROM drive may not be booting from the CD-ROM properly. Verify the jumpers are set properly on the CD-ROM drive.
    • Verifying the CD-ROM cables are correctly connected.

    Computer hard drive is not properly setup in CMOS

    Verify that your computer hard drive is properly setup in the CMOS setup. Improper settings can cause this error.

    Corrupt NTLDR or NTDETECT.COM file

    Windows 2000 users
    Windows XP users
    Windows 2000 users
    If your computer is using Microsoft Windows 2000 and you are encountering the NTLDR error. Create the below boot.ini file on the floppy diskette drive.
    [boot loader]
    timeout=30
    default=multi(0)disk(0)rdisk(0)partition(1)\WINNT
    [operating systems]
    multi(0)disk(0)rdisk(0)partition(1)\WINNT="Microsoft Windows 2000 Professional" /fastdetect
    Copy the NTLDR and NTDETECT.COM files from another computer using the same operating system. Both of these files are located in the root directory of the primary hard drive. For example, C:\NTLDR and C:\NTDETECT.COM should be the locations of these files on many computers.
    • How do I view hidden files in Windows?
    Once these files have been copied to a floppy diskette reboot the computer and copy the NTLDR and NTDETECT.COM files to the root directory of the primary hard drive. Below is an example of what commonly should be performed from the A:\> drive.
    copy ntldr c:
    copy ntdetect.com c:
    After the above two files have been copied, remove the floppy diskette and reboot the computer.
    Windows XP users
    1. Insert the Windows XP bootable CD into the computer.
    2. When prompted to press any key to boot from the CD, press any key.
    3. Once in the Windows XP setup menu press the "R" key to repair Windows.
    4. Log into your Windows installation by pressing the "1" key and pressing enter.
    5. You will then be prompted for your administrator password, enter that password.
    6. Copy the below two files to the root directory of the primary hard drive. In the example below we are copying these files from the CD-ROM drive letter, which in this case is "e." This letter may be different on your computer.

      copy e:\i386\ntldr c:\
      copy e:\i386\ntdetect.com c:\
    7. Once both of these files have been successfully copied, remove the CD from the computer and reboot.

    Misconfiguration with the boot.ini file

    Edit the boot.ini on the root directory of the hard drive and verify that it is pointing to the correct location of your Windows operating system and that the partitions are properly defined.

    Attempting to upgrade from a Windows 95, 98, or ME computer that is using FAT32

    If you are getting this error message while you are attempting to upgrade to Windows 2000 or Windows XP from Windows 95, Windows 98, or Windows ME running FAT32 try the below recommendations.
    1. Boot the computer with a Windows 95, Windows 98 or Windows ME bootable diskette.
    2. At the A:\> prompt type:

      sys c: <press enter>
    3. After pressing enter you should receive the "System Transferred" message. Once this has been completed remove the floppy diskette and reboot the computer.

    New hard drive being added

    If you are attempting to add a new hard drive to the computer make sure that drive is a blank drive. Adding a new hard drive to a computer that already has Windows installed on it may cause the NTLDR error to occur.
    If you are unsure if the new drive is blank or not try booting from a bootable disketteand format the new hard drive.

    Corrupt boot sector or master boot record

    It's possible your computer's hard drive may have a corrupt boot sector or master boot record. These can be repaired through the Microsoft Windows Recovery console by running the fixboot and fixmbr commands.

    Seriously corrupted version of Windows 2000 or Windows XP

    If you have tried each of the above recommendations that apply to your situation and you continue to experience this issue there may be a serious corruption with Microsoft Windows. Therefore we would recommend reinstalling Microsoft Windows.
    If you are encountering this issue during your setup you may want to completely erase your computer hard drive and all of its existing data and then install Microsoft Windows.

    Loose or Faulty IDE/EIDE hard drive cable

    This issue has been known to be caused by a loose or fault IDE/EIDE cable. If the above recommendation does not resolve your issue and your computer hard drive is using an IDE or EIDE interface. Verify the computer hard drive cable is firmly connected by disconnected and reconnecting the cable.
    If the issue continues it is also a possibility that the computer has a faulty cable, try replacing the hard drive cable with another cable or a new cable.

    Author : Computer Hope

    Windows 8 Charms

    Windows 8 Charms

    The Windows Charms is a new feature that was introduced with Windows 8 that gives you access to Search, Share, Start, Devices, and Settings. This menu appears when you move you mouse on the right-hand side of the screen or press the Windows key + C on the keyboard. The black bar along the right-hand side of the picture below is an example of what the Windows Charms looks like when open.
    Windows 8 Charms

    Description of each of the Windows 8 Charms

    • Search (shortcut: Windows key + F) - Find and open any program or file.
    • Share (shortcut: Windows key + H) - Share and send links, photos, and more to your friends and social networks in the app currently open.
    • Start (shortcut: Windows key) - Open the Windows 8 Start Menu.
    • Devices (shortcut: Windows key + K) - List available devices, for example a second screen.
    • Settings (shortcut: Windows key + I) - View Start Settings, view settings such as battery monitor, volume, brightness, notifications, and the power (to shutdown computer). In Settings you'll also find More PC Settings at the bottom of the menu, which gives you all available settings that can be adjusted.
    Author : Computer Hope

    Windows 8 Picture Password

    Picture password

    Picture password is a feature introduced with Windows 8 that allows you to create three different gestures on any image of your choice and use those gestures as your password. The gesture can be any combination of circles, straight lines, and taps. For example if the picture you chose was of a face your picture password could be a tap on each eye and then a circle around the mouth. 

    How do I enable a Windows 8 picture password?

    1. Open the Windows Charms.
    2. Click Settings and then More PC settings
    3. In the PC settings window click Users and then select Create a picture password
    Also see: AuthenticationPassword, Windows 8

    Author : Computer Hope

    Top 10 Windows 8 tips and tricks

    Top 10 Windows 8 tips and tricks

    Update to Windows 8.1

    Windows 8 tilesMicrosoft has released Windows 8.1, which is a free upgrade for anyone running Windows 8. This update addresses many of the problems users have had with Windows 8 and also adds a Start button. Visit Microsoft's Windows 8.1 page for the update.

    Customize your tiles

    Make the most of your Windows Start screen tiles by adjusting the sizes, where they are located, and what is listed.
    • Move any tile by clicking and dragging the tile. While moving a tile, if you need a larger view of the Start screen move the tile towards the top or bottom of the screen to zoom out.
    • Use your mouse wheel to scroll left-to-right through your tiles.
    • Any Desktop shortcut or program can be pinned to the Start screen by right-clicking the icon and choosing Pin to Start.
    • In the bottom right-hand corner of the start screen is a magnifying glass with tiles, click this icon to get a zoomed out view of your Start screen. In this view, if you right-click on a group of tiles you'll be given the option to name group, which can be useful if you have a group of related tiles (e.g. games). In this view, you can also click and drag a group to organize your tile groups.
    • Create a new speed bump between tile groups by moving a tile to a speed bump.
    • Resize any User tile or Live tile by right-clicking the tile and choosing resize.
    • If there is a tile you want on your Taskbar, right-click the tile and choose Pin to taskbar.
    • Show admin applications on the Start screen by clicking Settings in Charms, click Settings, and change the Show administrative tools from No to Yes.
    • In Internet Explorer 10, you can also pin any of your favorite web pages to your Start Screen.

    Windows 8 keyboard shortcuts

    Knowing at least some of the Windows 8 keyboard shortcuts helps make your Windows 8 experience much more enjoyable. Try to memorize these top Windows 8 shortcut keys.
    • Press the Windows key to open the Start screen or switch to the Desktop (if open).
    • Press the Windows key + D opens the Windows Desktop.
    • Press the Windows key + . to pin and unpin Windows apps on the side of the screen.
    • Press the Windows key + X to open the power user menu, which gives you access to many of the features most power users would want (e.g. Device Manager and Command Prompt).
    • Press the Windows key + C to open the Charms.
    • Press the Windows key + I to open the Settings, which is the same Settings found in Charms.
    • Press and hold the Windows key + Tab to show open apps.
    • Press the Windows key + Print screen to create a screen shot, which is automatically saved into your My Pictures folder.
    See our Windows shortcuts page for a full listing of all Windows shortcuts.

    Know your hot corners

    The corners on your screen are hot corners and give you access to different Windows features. Below, is a brief explanation of each of these corners.
    Bottom Left-hand corner
    The bottom left-hand hot corner of the screen allows you to access the Start screen, if you're in the Start screen and have the Desktop open, this corner opens the Desktop from the Start screen.
    Tip: Right-clicking in the left hand corner opens the power user menu.
    Top-left corner of the screen
    Moving the mouse to the top-left corner and then down displays all the apps running on the computer. Clicking and dragging any of these apps to the left or right-hand side of the screen will snap that app to that side of the screen. Each of these open app icons can also be right-clicked to close or snap.
    Right-hand side of the screen
    On the full right-hand side of the screen will be given access to the Windows Charms.

    Taking advantage of search

    The Search in Windows 8 has been significantly improved when compared to all previous versions of Windows. To search for a file or run a program in Windows 8 from the Start screen just start typing what you're trying to find or want to run.
    As you begin typing, the results will start appearing on the left-hand side. In addition to being able to search for files and run programs, the Search also supports limiting the search to apps such as Finance, People, Maps, Photos, Mail, Music, Videos, Weather, and much more. If what you are searching for is not a file or program, click on the app you want to use as the search. For example, if you were searching for "New York" and selected the Weather App you would be shown the weather in New York, NY.
    By default, Search organizes the available Apps by how frequently they are used and then in alphabetical order. If you want to keep your favorite app at the top of the Search list, right-click the app and choose Pin. Pinning the app will lock it in place regardless of how often it is used. If there is an app you don't want (e.g. Finance) you can turn on and off any of the search apps through the PC settings, which is found under the Settings in the Charms.
    Bonus tip: The Search is also found through Charms and can also be opened by pressing Windows key + F.

    Running two apps side by side

    Any app can be pinned to the left or right-hand side of the screen. For example, open the People app and then press the Windows Key + . (period) to move that app to the right-hand side of the screen, pressing the same keys again will move it to the left-hand side, and pressing the same keys again makes it full screen. While an app is pinned, any other app or program can be opened and loaded into the available space on the screen. For example, in the picture below, we've opened a browser window and have the People app running to monitor our social networks.
    Any open app can also be pinned using your mouse by clicking at the top of the tile and dragging it to the left or right-hand side of the screen.
    Bonus tip: The Desktop can also be pinned to the left or right-hand side of the screen.
    Note: In order for snap to work properly your resolution must be at least 1,366 x 768.

    Windows 8 Task Manager

    The Windows 8 Task Manager has been significantly improved over previous versions of Windows. Some of the new changes include showing a total percent usage at the top of your Processes, which makes it easier to determine total memory and CPU usage, improved Performance graphs, a Startup tab to see startup processes and their impact to system performance, and the App history tab (as shown below) that gives you the total resources an app has used over a period of time. Press Ctrl + Shift + Esc to start exploring the new Task Manager.
    Windows 8 Task Manager

    Use a picture password to log into your computer

    Windows 8 includes a new feature called Picture password, which allows you to authenticate with the computer using a series of gestures that include circles, straight lines, and taps. Enable this feature if you want a new way to access your computer or have a hard time with passwords.
    1. Open the Windows Charms.
    2. Click Settings and then More PC settings
    3. In the PC settings window click Users and then select Create a picture password
    Bonus tip: A four digit pin password can also be created and used to access your computer.

    Take advantage of Windows 8 apps

    Windows 8 comes included with several apps to help you get the most from your computer. Below are just a few of the included apps.
    People
    Microsoft touts the People feature in Windows 8 because they understand how many people are using social networks today. In the People feature you'll be able to connect your Windows computer to all the major social networks including FacebookLinkedIn, and Twitter. Once connected, you can pin the people app and monitor your social network (as shown below), use People in Search to find people, and get an overview of what is happening in all your social networks.
    Reader
    The Reader app gives you PDF support right out of the box.
    SkyDrive
    The SkyDrive app gives you access to the Microsoft cloud service SkyDrive, which allows you to store your photos, documents, and other files in the cloud and access or share those files with any computer with Internet access.
    Store
    Take advantage of the Windows Store and install one or more of the thousands of available apps designed for Windows 8. The Store is found in the Start screen, or use Search to search the Store app for any apps that you are trying to find.

    Author : Computer Hope