Our social:

Latest Post

Create a local user account

Create a local user account


To create a local user account

  1. Open Computer Management.
  2. In the console tree, click Users .
    Where?
    • Computer Management\System Tools\Local Users and Groups\Users
  3. On the Action menu, click New User .
  4. Type the appropriate information in the dialog box.
  5. Select or clear the check boxes for:
    • User must change password at next logon
    • User cannot change password
    • Password never expires
    • Account is disabled
  6. Click Create , and then click Close .

Additional considerations

  • To perform this procedure, you must provide credentials for the Administrator account on the local computer (if you are prompted), or you must be a member of the Administrators group on the local computer.
  • A user name cannot be identical to any other user name or group name on the computer that is being administered. The user name can contain up to 20 uppercase characters or lowercase characters, except for the following:

    " / \ [ ] : ; | = , + * ? < > @

    A user name cannot consist solely of periods (.) or spaces.
  • In Password and Confirm password , you can type a password containing up to 127 characters.
  • The use of strong passwords and appropriate password policies can help protect your computer from attack.


Author : technet.microsoft

How to Add Your Gmail Account to Outlook 2013 Using IMAP

How to Add Your Gmail Account to Outlook 2013 Using IMAP


00_lead_image_gmail_in_outlook
If you use Outlook to check and manage your email, you can easily use it to check your Gmail account as well. You can set up your Gmail account to allow you to synchronize email across multiple machines using email clients instead of a browser.
We will show you how to use IMAP in your Gmail account so you can synchronize your Gmail account across multiple machines, and then how to add your Gmail account to Outlook 2013.

To setup your Gmail account to use IMAP, sign in to your Gmail account and go to Mail.
01_clicking_mail
Click the Settings button in the upper, right corner of the window and select Settings from the drop-down menu.
02_clicking_settings
On the Settings screen, click Forwarding and POP/IMAP.
03_clicking_forwarding_pop_imap
Scroll down to the IMAP Access section and select Enable IMAP.
04_enabling_imap
Click Save Changes at the bottom of the screen.
05_clicking_save_changes
Close your browser and open Outlook. To begin adding your Gmail account, click the File tab.
06_clicking_file_tab_in_outlook
On the Account Information screen, click Add Account.
07_clicking_add_account
On the Add Account dialog box, you can choose the E-mail Account option which automatically sets up your Gmail account in Outlook. To do this, enter your name, email address, and the password for your Gmail account twice. Click Next.
08_selecting_email_account
The progress of the setup displays. The automatic process may or may not work.
09_configuring_automatically
If the automatic process fails, select Manual setup or additional server types, instead of E-mail Account, and click Next.
10_selecting_manual_setup
On the Choose Service screen, select POP or IMAP and click Next.
11_selecting_pop_or_imap
On the POP and IMAP Account Settings enter the User, Server, and Logon Information. For the Server Information, select IMAP from the Account Type drop-down list and enter the following for the incoming and outgoing server information:
  • Incoming mail server: imap.googlemail.com
  • Outgoing mail server (SMTP): smtp.googlemail.com
Make sure you enter your full email address for the User Name and select Remember password if you want Outlook to automatically log you in when checking email. Click More Settings.
12_pop_imap_account_settings
On the Internet E-mail Settings dialog box, click the Outgoing Server tab. Select the My outgoing server (SMTP) requires authentication and make sure the Use same settings as my incoming mail server option is selected.
13_setting_up_outgoing_server
While still in the Internet E-mail Settings dialog box, click the Advanced tab. Enter the following information:
  • Incoming server: 993
  • Incoming server encrypted connection: SSL
  • Outgoing server encrypted connection TLS
  • Outgoing server: 587
    NOTE: You need to select the type of encrypted connection for the outgoing server before entering 587 for the Outgoing server (SMTP) port number. If you enter the port number first, the port number will revert back to port 25 when you change the type of encrypted connection.
    Click OK to accept your changes and close the Internet E-mail Settings dialog box.
    14_advanced_settings
    Click Next.
    15_clicking_next
    Outlook tests the accounts settings by logging into the incoming mail server and sending a test email message. When the test is finished, click Close.
    16_testing_account_settings
    You should see a screen saying “You’re all set!”. Click Finish.
    17_clicking_finish
    Your Gmail address displays in the account list on the left with any other email addresses you have added to Outlook. Click the Inbox to see what’s in your Inbox in your Gmail account.
    18_new_account_in_outlook
    Because you’re using IMAP in your Gmail account and you used IMAP to add the account to Outlook, the messages and folders in Outlook reflect what’s in your Gmail account. Any changes you make to folders and any time you move email messages among folders in Outlook, the same changes are made in your Gmail account, as you will see when you log into your Gmail account in a browser. This works the other way as well. Any changes you make to the structure of your account (folders, etc.) in a browser will be reflected the next time you log into your Gmail account in Outlook.

    Author : howtogeek

    How to Hide Email Addresses when Sending to Multiple Recipients in Outlook 2013

    How to Hide Email Addresses when Sending to Multiple Recipients in Outlook 2013


    00_lead_image_spam_email
    When sending email to multiple recipients (some of whom are unknown to each other), it’s recommended not to display everyone’s email address. Some people might get quite upset with you for advertising their email address to people they don’t know.
    Generally, when you send email to multiple recipients, you enter their email addresses in the Cc (Carbon Copy) field, where their addresses are visible to everyone receiving the email. This is acceptable if all the people already know each other and may even have the email addresses. However, if some of the people you’re including in the Cc field do not know each other, it’s not a good idea to use the Cc field and advertise everyone’s email address to everyone else.

    This is where the Bcc (Blind Carbon Copy) field comes in. Putting an email address in the Bcc field basically instructs the mail server to take off the address label before delivering the message so anyone receiving the email message cannot see who else received it. So, you can put all the email addresses of the recipients in the Bcc field. However, only putting email addresses in the Bcc field, with no address (or your own address) in the To field, may cause the message to be flagged as Spam by some junk email filters.
    There is a way around this. We will show you how to use your own email address as “Undisclosed recipients” for the To field and add the other email addresses to the Bcc field so you can safely send your message.
    Open Outlook and click the People link on the Navigation Bar.
    01_clicking_people
    NOTE: If you have the Navigation Bar displaying in the compact view, click the people icon.
    See our article to learn how to display the Navigation Bar in the compact view.
    02_clicking_people_on_compact_navigation
    In the New section of the Home tab, click New Contact.
    03_clicking_new_contact
    In the Full Name edit box, enter a name for this contact that will display in the To field. You can call it “Undisclosed recipients” or any other name you want. Enter your own email address in the E-mail field and click Save & Close.
    04_creating_new_contact
    Now, click Mail on the Navigation Bar. If you have the compact Navigation Bar, click the envelope icon.
    05_clicking_mail
    In the New section of the Home tab, click New Email.
    06_clicking_new_email
    Click To on the Message window.
    07_clicking_to
    Select the new contact made for your own email address, click To, and then click OK.
    08_selecting_undisclosed_recipients
    You may notice that there is no Bcc field available on the Message window. You have to add it. To do this, click the Options tab, and in the Show Fields section, click Bcc.
    09_showing_the_bcc_field
    The Bcc field is added to the Message window. Add the email addresses for all the people you want to receive this email either by clicking the Bcc button and selecting them, or by entering them manually in the Bcc field. As you start typing an address in the Bcc field, a matching address from your address book is suggested.
    NOTE: You can also create a distribution list containing all the email addresses you to which you often send emails as a group. See our article about creating distributions lists in Outlook 2013 to find out how.
    Some ISPs (Internet Service Providers) may put limits on the number of people to which you can send one email. In this case, try sending the message to 20 recipients or less at a time per email.
    10_entering_bcc_recipients
    If you send one email to multiple recipients with all the addresses visible to all, you can cause some people to receive spam, if some people on your list are not careful with the email addresses they have. There are plenty of other ways spammers can get your email address.


    Author : howtogeek

    How to setup gmail with outlook 2007 - gmail configuration for outlook

    How to setup gmail with outlook 2007 - gmail configuration for outlook


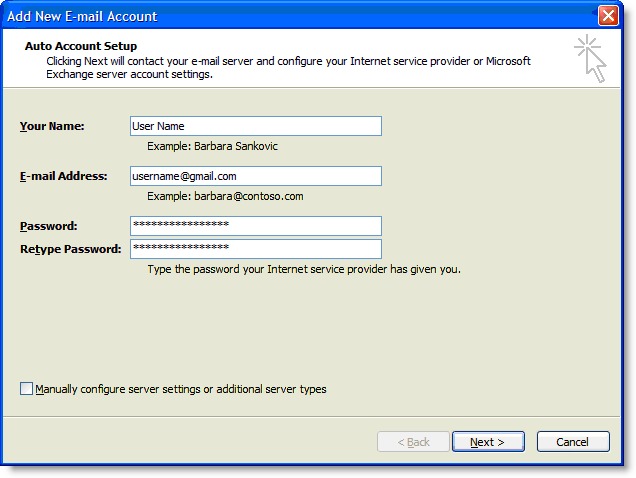
    To configure Outlook 2007 for your Gmail address:
    1. Enable POP in your email account. Don't forget to click Save Changes when you're done.
    2. Open Outlook.
    3. Click the Tools menu, and select Account Settings...
    4. On the E-mail tab, click New...
    5. If you are prompted to Choose E-mail Service, select Microsoft ExchangePOP3IMAP, or HTTP, and click Next.
    6. Fill in all necessary fields to include the following information:
    7. Your Name: Enter your name as you would like it to appear in the From: field of outgoing messages.
      Email Address: Enter your full Gmail email address (username@gmail.com). Google Apps users, enter your full address in the formatusername@your_domain.com.
      Password: Enter your email password.
      Manually configure server settings or additional server types: Leave this option unchecked if you want to automatically configure Outlook 2007. If you want to manually configure Outlook 2007, check this box now. Google Apps users should configure manually as follows.
      Enter name, email address, and password
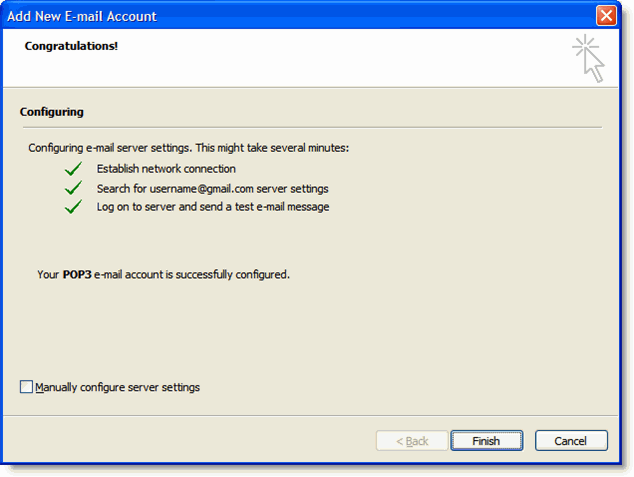
    8. Click Next. If you are configuring Outlook 2007 automatically, you're done! Just click Finish.
    9. Successful Configuration
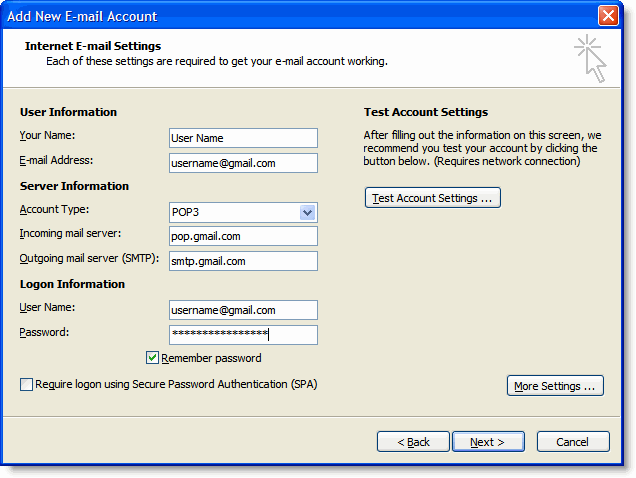
    10. If you are configuring Outlook 2007 manually, select Internet E-mail and click Next.
    11. Verify your User Information, and enter the following additional information:
    12. Server Information
      Account Type: POP3
      Incoming mail server: pop.gmail.com (Google Apps users, enter the server names provided, don't add your domain name in these steps)
      Outgoing mail server (SMTP): smtp.gmail.com
      Logon Information
      User Name: Enter your Gmail username (including @gmail.com). Google Apps users, enter your full address in the format username@your_domain.com
      Password: Enter your email password.
      Require logon using Secure Password Authentication (SPA): Leave this option unchecked.
      Account Settings
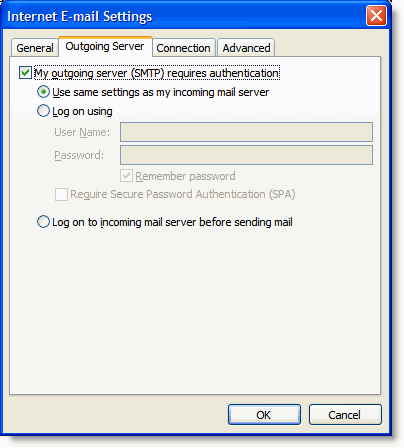
    13. Click the More Settings... button, and select the Outgoing Server tab.
    14. Check the box next to My outgoing server (SMTP) requires authentication and select Use same settings as my incoming mail server.
    15. Outgoing Server Tab
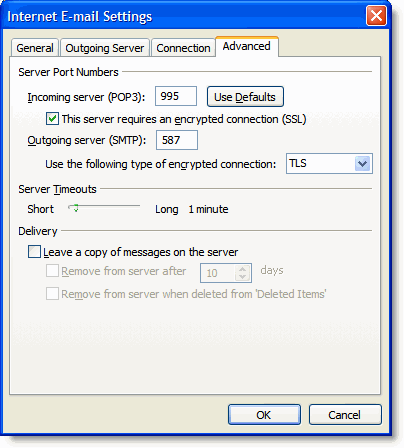
    16. Click the Advanced tab, and check the box next to This server requires an encrypted connection (SSL) under Incoming Server (POP3).
    17. In the Outgoing server (SMTP) box, enter 587, and select TLS from the drop-down menu next to Use the following type of encrypted connection:.
    18. Advanced Tab
    19. Click OK.
    20. Click Test Account Settings... After receiving 'Congratulations! All tests completed successfully', click Close.
    21. Click Next, and then click Finish.
    Congratulations! You're done configuring your client to send and retrieve Gmail messages.


    Author : webdesignerexpress

    Top 10 Windows 7 tips

    Top 10 Windows 7 tips

    Windows 7 keyboard shortcuts

    Use the below Windows 7 keyboard shortcuts to make the most of your Windows 7 experience.
    Windows key and the arrow keys
    Pressing the Windows key and Left or Right arrow keys will dock the window your viewing to the left or right-hand side of the screen. Pressing the Windows key and the Up arrow will maximize a window and pressing the Windows key and the Down arrow will resize and then minimize the window.
    Use Shift: To stretch a window vertically, press the Windows key + Shift + the Up arrow. If you have multiple monitors use the Windows key + Shift + the Left or Right arrow keys to move the window to another monitor.
    Windows key and plus and minus keys
    If you ever need to zoom in or out of what is being displayed on your screen press the Windows key and the + (plus) or - (minus) keys. Pressing the plus zooms in and once zoomed in the minus will zoom out.
    Clear all background programs
    If you are not viewing a window in full screen and have other windows open in the background clear all background open windows by pressing the Windows key + theHome key.
    • Full listing of computer shortcuts

    Use the Windows 7 search

    Find and run anything in Windows by using the Windows 7 search box. Click the Start orb or press then Windows key and type the name of the program you want to run or file you want to edit. Windows 7 does a good job at finding an exact match and simply pressing enter will execute that program or open that file. If more than one match is found, use the up and down arrow keys to select the file you want to open and then press Enter.
    Windows 7 search box
    Running as administrator: Some programs may require administrator mode in order to function properly. You can run any program as administrator from the search box by typing the name of the program you want to run and then instead of pressing Enter to run the program press Ctrl+Shift+Enter to run as administrator. If you want to click and run a program as administrator hold down the Ctrl+Shift and then click the icon.

    Take full advantage of the Taskbar

    Pin programs to the Taskbar
    All programs can be pinned to the Taskbar and allow easy access to your favorite programs without having to use the Start Menu. To Pin a program to the Taskbar right-click on the program or shortcut to the program and in the menu choose the Pin to Taskbar option. Alternatively you can also drag the icon to the Taskbar.
    If you want to remove a pinned program, right-click on the Taskbar icon and clickUnpin this program from the Taskbar. Alternatively you can also drag the icon off of the task bar and then click Unpin this program from the Taskbar.
    Move the icons and pinned programs
    Any pinned or opened program on the Taskbar can be moved and arranged. Left-click on any icon on the Taskbar and drag it to the location you want it to remain.
    Windows key and a number
    Pressing the Windows key and a number on the top row of your keyboard open the Window corresponding to the open program on your Taskbar. For example, in the picture below of the Windows 7 Taskbar, Firefox i the first icon, Control panel is the second icon, and Adobe Photoshop is the third icon. If the Windows key + 3 was pressed, Adobe Photoshop would become the active window. To make it even easier arrange your icons (as mentioned above) from left to right by most frequently opened.
    Windows 7 Taskbar
    Pin your favorite folder
    If you frequently access the same folder (e.g. your favorites, my documents, Dropbox, etc.) pin the folder to the Windows Explorer icon on the Taskbar. To do this drag your favorite folder to the Taskbar until you see Pin to Windows Explorer. Once pinned, right-click the Explorer icon to access that folder under the Pinned section.
    Open a second instance
    If you want to open a second instance or window of a program that is already open, press and hold the Shift key and then click the program icon on the Taskbar.
    Get to the Desktop
    Click the Desktop button on the far right edge of the Taskbar to get to the Desktop.

    Windows 7 notification area aka systrayCustomize the Notification area

    Windows Vista and Windows 7 allow the Windows Notification area (aka Systray) to be modified. By default, many of the icons shown in the past are now hidden and give Windows a much cleaner look. Customize this area to make icons show or not show by clicking on the up arrow next to the icons and selecting Customize, as shown in the picture. Once in Customize you can choose what programs show, don't show, or only show notifications.

    Improve the quality of your text

    Use the Windows ClearType Text Tuner to improve the overall quality of all text you read on your screen. To start the ClearType Text Tuner click the Start Orb and typecttune.exe and press Enter.

    Enable and disable Windows 7 features

    Turn on and off Windows features by clicking Start, typing features and press enter. In the Programs and Features window on the left-hand column click Turn Windows features on or off and in the Windows Features box check or uncheck the features you want enabled or disabled.

    Use the Reliability and Performance Monitor

    View the reliability history of your computer by using the Reliability Monitor. Click the Start orb and type reliability and press enter for View Reliability History. In the Reliability Monitor, you'll be able to view the overall reliability of your computer and be able to identify any past problems your computer has had.
    If you want to view the performance of your computer in real time use the Performance Monitor. Click the Start orb and type performance and press enter for the Performance Monitor. In the Performance Monitor, you can view your computers performance in real time or view a log of your systems performance.

    Re-enable underlined keyboard shortcuts

    File menu underlined shortcutsBy default, Windows 7 has the underlines for keyboard shortcuts like those shown in the picture. To re-enable these underlines in all Windows programs follow the steps below.
    1. Open the Control Panel
    2. In the Control Panel click Ease of Access
    3. In Ease of Access click Change how your keyboard works
    4. Finally, check the Underline keyboard shortcuts and access keys and then click Ok.

    Rename multiple files at once

    To change the name of multiple files at once highlight all the files you want to rename in Windows Explorer and press the F2 key. Type in the new name you want to use for all files and press enter. Once done all files will be renamed to the name entered followed by a unique number.

    Install Windows Essentials

    Install missing Windows software by installing the free Windows Essentials software package that includes: Windows Live Family Safety, Windows Live Mail, Windows Live Messenger, SkyDrive for Windows, Windows Movie Maker, Windows Photo Gallery, Windows Live Writer, and Microsoft Outlook Hotmail Connector.
    Author : Computer Hope

    How to add colorful Total Pageviews widget


     How to add colorful Total Pageviews widget?


    Widget can helps you to make a wonderful blog. Total Pageview widget is a important widget for your blog. Everyone can to know about your blogs statistics. How number of  visitors visit your blog. Total post & total comments are also shown through this widget. This widget is more colorful & attractive.  We use some css code so don't be afraid because css code never use your memory. To add this widget just follow this post steps by steps.
    Pageviews widget

    How to add ?


    • Log in your blog
    • Go to Templates
    • Then click Edit Html
    • Search (ctrl+f) ]]></b:skin>
    • Add bellowing css code just before/above ]]></b:skin>

    #Stats1 ul{margin:0px 0;border:0;padding:0}
    #Stats1 li{
    display:inline;
    width:30%;
    border:0;
    color:#fff;
    float:left;
    text-decoration:none;
    margin:0;font-size:12px;
    list-style-type:none
    }
    #Stats1 li:hover{
    opacity: 0.7;
    filter:alpha(opacity=70); /* For IE8 and earlier */
    }
    #Stats1 h4{margin:0;font-size:18px;line-height:1.2em;color:#fff;padding: 0 5px 0 5px;}
    #Stats1 span{font-size:12px;color:#fff;padding: 0 5px 0 5px;}
    #totalposts{
    background: #0090D5;
    }
    #totalComments{
    background: #FFB200;
    }
    #totalCount{
    background: #FF3300;

    • Then you have to search
    <b:widget id='Stats1' locked='false' title='Total Pageviews' type='Stats'>...</b:widget>
    • Replace the following code

    Pageviews widget

    <b:widget id='Stats1' locked='false' title='' type='Stats'>
      <b:includable id='main'>
    <b:if cond='data:title'><h2><data:title/></h2></b:if>
        <div class='widget-content'>
          <ul>
            <li id='totalposts'>
              <h4 id='Stats1_totalPosts'>&amp;hellip;</h4>
              <span>Posts</span>
            </li>
            <li id='totalComments'>
              <h4 id='Stats1_totalComments'>&amp;hellip;</h4>
              <span>Comments</span>
            </li>
            <li id='totalCount'>
              <h4 expr:id='data:widget.instanceId + &quot;_totalCount&quot;'>&amp;hellip;</h4>
              <span>Pageviews</span>
            </li>
          </ul>
          <script type='text/javascript'>
    //<![CDATA[
    function totalPosts(json){document.getElementById('Stats1_totalPosts').innerHTML=json.feed.openSearch$totalResults.$t};function totalComments(json){document.getElementById('Stats1_totalComments').innerHTML=json.feed.openSearch$totalResults.$t};document.write('<script type=\"text/javascript\" src=\"/feeds/posts/default?alt=json-in-script&max-results=0&callback=totalPosts\"><\/script><script type=\"text/javascript\" src=\"/feeds/comments/default?alt=json-in-script&max-results=0&callback=totalComments\"><\/script>');
    //]]>
          </script>
        </div>
      </b:includable>
    </b:widget>

    Note:You should back up your template first.


    Author : tech-everyday

    How do I create a new user in Windows

    How do I create a new user in Windows?


    Windows Vista and Windows 7 users
    Windows XP users

    Windows Vista and Windows 7 users

    1. Open the Windows Control Panel.
    2. Click on Add or remove user accounts.
    3. Click Create a new account.
    4. Enter the account name you want to use and the type of account. For most accounts, we'd suggest using "Standard user".
    5. Finally, click the Create Account button.
    After the account has been created the name, password, picture, parental controls, and other settings can be changed by clicking the account in the account listing.

    Windows XP users

    1. Open the Windows Control Panel.
    2. Open User Accounts.
    3. In the User Accounts window click the Create a new account link.
    4. Enter the name for the account and click Next.
    5. Select the account type. For most accounts, we'd suggest using a "Limited account".
    6. Finally, click the Create Account button.
    After the account has been created the name, password, picture, parental controls, and other settings can be changed by clicking the account in the account listing.

    Author : Computer Hope

    How to disable the USB ports?

    How to disable the USB ports?

    USB portsYou may need to disable the USB ports on a computer to prevent anyone from using any USB devices with a computer. In work environments, disabling USB ports can help prevent any USB drives being connected to a computer, which could be used to steal company information or infect that computer and potentially other computers on the network with viruses or other malware.

    Disable the USB ports through BIOS setup

    1. Enter the BIOS setup.
    2. Once in the BIOS setup check the menus for an option to enable or disable the onboard USB ports.
    3. Make sure all USB and Legacy USB Support is disabled or off.
    4. Once the changes are made save and exit. Typically this is the F10 key.
    5. After the computer has rebooted, check the USB ports to make sure they have been disabled.

    Disabling USB in Windows

    If your computer BIOS setup does not have the option to disable the USB or disabling the USB ports in BIOS does not disable all of your ports, and you are running Windows XP, Vista, 7, or 8 follow the steps below to disable the USB ports.
    Note: The steps below edit the Windows Registry. Be aware that changing any values to their improper values can cause errors or Windows to not boot.
    Tip: The steps below only disable any USB storage device run starting (e.g. flash drive). USB devices like the keyboard and mouse will still work.
    1. Open the Windows Registry by typing regedit in the Run line.
    2. Once in the Registry editor open the below folder
    HKEY_LOCAL_MACHINE\SYSTEM\CurrentControlSet\Services\USBSTOR
    3. In the USBSTOR locate the "Start" DWORD and double-click "Start" to edit the value. Change the Value data to "4" and then click Ok.
    4. Once completed, close the Registry editor, and Windows will no longer start the USB when detected.
    Tip: If you need to re-enable the USB after following the above steps follow the above steps again and change the value from "4" to "3".
    Caution: The above steps only work if the USB storage driver has already been installed. If you are doing this for security reasons and the USB storage driver has not been installed the value gets reset back to 3 when a user connects a USB storage device and Windows installs the drivers.

    Disconnect USB

    Although it is often not possible to physically disconnect the USB ports on themotherboard other USB ports like those on the front or top of the computer can be physically disconnected by disconnecting the cable going to the USB header. Disconnecting these USB ports can be helpful in preventing users from easily attaching USB devices without having to go to the back of the computer.

    Author : Computer Hope

    How do I password protect my files and folders in Windows?

    How do I password protect my files and folders in Windows?

    Tip: Before password protecting any document you may want to create a backup of the non-password protected folder and files in case you forget the password in the future.
    The majority of Microsoft Windows operating systems do not come with a method of password protecting your sensitive files and folders. If you're using Microsoft Windows 3.x, Windows 95, Windows 98, you need to download or purchase a third-party program to password protect your files and folders in Windows; skip down to the other security solutions section if you're using one of these operating systems.
    Microsoft Windows XP professional users
    Microsoft Windows XP home users
    Other security solutions for protecting your files and folders in Windows
    Things to remember when encrypting or password protecting files and folders

    Microsoft Windows XP professional users

    The steps below for encrypting the files on Windows XP professional applies to users who are using a computer that has different accounts. If you are using a single account see the other security solutions section.
    1. Select the folder you want to encrypt.
    2. Right-click the folder and click Properties.
    3. Click the Advanced button.
    4. Check "Encrypt contents to secure data" option.
    5. Click Apply and then Ok.
    Encrypt contents to secure data is grayed out
    This will be grayed out if you're using the home edition of Microsoft Windows XP. See the steps below for securing the contents of your folders in Windows XP home.
    Show "Encrypt" on the context menu
    The newest version of TweakUI also enables you to show the Encrypt option in the context menu. To do this, follow the steps below.
    1. Open TweakUI.
    2. In the TweakUI window, select Explorer
    3. In the right side of the window under Settings, locate Show 'Encrypt' on context menu and check the box. This option should be below Prefix 'shortcut to' on new shortcuts and above Show 'View workgroup computers' in NetPlaces.
    • I'm missing Show "Encrypt" on the context menu in TweakUI.

    Microsoft Windows XP home users

    1. Select the folder you want to encrypt.
    2. Right-click the folder and click Properties.
    3. Click the Sharing tab.
    4. Check the box Make this folder private
    5. Click Apply and then Ok.
    Make this folder private is grayed out
    In order for this option to work in Microsoft Windows XP home you must meet the below requirements.
    1. The hard drive must be formatted in NTFS and not FAT32 File System.
    2. The folder you're attempting to encrypt must be in your own personal folder. For example, if your name is bob, you must be encrypting a folder that is or that is contained within the below folder:

      C:\Documents and Settings\Bob\

      You cannot encrypt any folders outside of this folder. If you want to encrypt outside this folder see the below other security solutions.

    Other security solutions for protecting your files and folders in Windows

    File and folders not frequently used
    If you need to password protect files or folders that you do not frequently use, one of the simplest ways is to compress the folder and files with a compression utility and password protect the compressed file. However, each time you want to work or modify the files you need to uncompress the files using the password.
    Windows ME and Windows XP users - Microsoft Windows ME and Windows XP come with their own compression utility. This utility can also be used to compress and password protect files.
    Tip: When a file is compressed, users can still view a listing of the files in the compressed file. If you want for both your file names and the contents to be hidden, move all the files into a single folder and password protect that folder.  
    File and folders frequently used or accessed
    If you need to password protect or encrypt data you frequently use, you need to install a third-party program that allows you to protect your files and folders. Below are some free and commercial solutions.
    • AxCrypt - An excellent free encryption utility that enables users to encrypt all files within a folder and not allow those files to be viewed unless a passphrase (password) is known.
    • WinCry - A freeware utility that enables your files to be encrypted, secure deletion, as well as other helpful methods of protecting your files.
    • Folder Guard - A commercial version of a password protection software that enables you to password protect files, folders, and other Windows resources.
    Click here to search for more solutions to password protect files and folders in Windows.

    Things to remember when encrypting or password protecting files and folders

    1. There is no such thing as a 100% protected file. There are numerous tools, utilities, and instructions for how to break encryption and passwords on files. However, the protection methods listed above will protect your files from the majority of users who may encounter them. If you are working with really sensitive data we suggest a commercial product for protecting your files and data.
    2. Even though a file or folder may be password protected it still can be deleted (unless the program supports the ability to protect files from being deleted). Always remember to backup all your files, even those protected by passwords.
    3. If you forget the password, unless you're willing to spend the time attempting to break it or pay someone else to break the password, all your file data will be lost. Unless you've made a backup of the non-password protected data.
    Author : Computer Hope